


Goat man horns
- kazulgfox
- Feb 9, 2022
- 4 min read
Updated: Feb 11, 2022
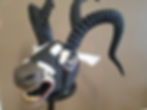
I built the Goatman for my husband to wear to Blizzcon 2018. The goatman is based on a Khazra, an enemy mob in Diablo 3, called the Moon clan shaman.

I loved the color scheme, the proportions of the body, and especially the shapes of the horns. That was one part of the project that I knew I wanted to get right. Not only capturing the shape, but making it safe and comfortable to wear. I have a video where I go into depth about how I made a harness to help support the weight of the head https://youtu.be/hUbqoWEEBGE but In this blog I want to cover more of the construction of the horns themselves. I was very proud of how large but lightweight and detailed they came out, so lets get to it!
Making the Pattern
As with most all my cosplay, I started with a scale sculpt. It really helped me nail the proportion to the head that I wanted, and more importantly the shape. Horns can be deceptively hard to pattern, especially when they curve in more than one direction. Here was my first sculpt
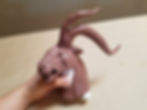
My usual method is to make a tiny tape pattern of this scale sculpt, scale it up and make the pattern out of foam. but when I did it with these horns, the shape distorted in a very unexpected way. The curves were not very shapely, the horns seemed limp instead of intimidating. I only built my pattern out of paper to see if my scale was correct, but I knew right away that the pattern wouldn't work. Unfortunately, my past self was too embarrassed at this fail that I didn't take any photos of it. I went back to my sculpt to make the shapes stronger. I decided to add more definition to the planes. Meaning I simplified it into a three sided shape (if you were to take a cross section, it would be triangular) Here is the updated sculpt:

Which not only did it help define the shape with more clarity, it incidentally made it easier to take the pattern from. Here is the horn with the tape pattern removed and placed on a transparency.

I used an overhead projector to quickly scale up and trace the pattern to paper for a test build.


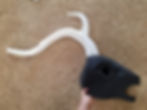
I was very happy with the size and shape of the paper test of the new horn, It was time to move onto the next step, building it with foam.
Material Selection
I new my material choice would be critical to the success of the project. I needed it to be lightweight enough to not hurt my husband's neck, but sturdy enough to hold it shape and a decent amount of detail. I could have tried going with my usual EVA 38, but I felt that would have been too heavy even though I knew I could get the detail I wanted from it. I cut equal sized pieces of EVA 38, L200 and L300 to understand the weight difference. I decided to go with L300 as it had the best balance of weight and density. I chose to make it out of 1/2" thick L300 so I had enough material to carve in deep ridges.


Carving
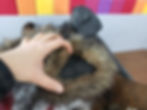
Carving was a huge task! it took many hours over two days, but it was worth it. I found some Video footage I captured and never edited, I'll get that uploaded soon. I worked in layers, Starting with the largest shapes. I used a large sanding drum on my dremel to carve thick ridges down the entire length. I also made sure to use a heat gun to "seal" the carving work after each layer

Next, I changed the Dremel to a small sanding drum to create texture on the inside of each larger ridge. I tried to keep my spacing and angles random so it would feel organic. I sometimes let the Dremel bounce around a bit to help with a more organic feel.

Next, I used a wood engraving tool and burned in fine details everywhere. This step took the longest, but it really brought the look together. Even though I was working in an open garage, I was wearing a respirator and safety goggles for all the steps of carving, but the respirator is ESPECIALLY important when using the wood engraver. The fumes are quite dangerous!

Mounting
I actually had this step figured out before, but we'll talk about it now. To mount the horns, I used two sets of Neodymium Magnets each. This is the exact magnet I used: https://amzn.to/3HHyFfD They're rated to hold up to 20 lbs, if it seems like that's overkill, it actually wasn't. It ended up being the perfect hold! I used two so that they would hold the right orientation. They would have swiveled around on just one! I glued the magnets to the base of the horn and the head and then covered both sides of the magnets with 2mm EVA-70 foam. This stuff isn't like your normal 2mm craft foamies, it is incredibly tough! you can try to tear it with all your strength, and it won't budge. buy it here: Ultra Firm EVA-70 Foam – TNT Cosplay Supply

The 4mm separation between the magnets (2mm on each side) reduces their strength a bit (which is why it was important to go with the "overkill" magnets"), but it also keeps them securely in place and keeps them from hitting too hard and cracking/shattering. The horns held on tight enough to stay in place through most all movements but gave way if they hit into anything (door frames, people) so as to not cause any damage.
Finishing
I sealed the foam with Semi Rigid Creature Cast Rubber in black. I like using creature cast because it a long-lasting strong alternative to Latex rubber. It's easy to apply and paint when it's dried and doesn't smell terrible!
After the sealing was done it was simple to paint and add accessories. I used craft grade paints, and a lot of dry brushing and Washes to get the finished look. That's the great thing about putting the effort into carving the details is that it makes painting really easy. I wrapped some fabric around part, and made some faux leather with more EVA foam for the finished look!


Conclusion
Again, I am very proud of these horns, they're so lightweight for their size and they performed perfectly for the finished costume. I hope you enjoyed reading about how I did it!
