


Making a two part mold
- kazulgfox
- Aug 20, 2022
- 4 min read
Updated: Aug 28, 2022
I have been making two-part molds for a while now, mainly thanks to my Esty store. I sell resin casts and I periodically have to remake a mold that wears out. I think the best part of having to remake the same mold over and over again is that I have been able to test different ways of making it and how it holds up to production. In this blog I'll show you what the tips I've learned make a great two-part mold.

Have a Master
The first step to having a good two-part mold is a good Master shape. I keep the bust pictured above just for this purpose, it was my first cast that I sanded very nicely. If you don't keep a Master, you'll inevitably lose detail with each mold, like when you make a xerox of a xerox of a xerox etc.
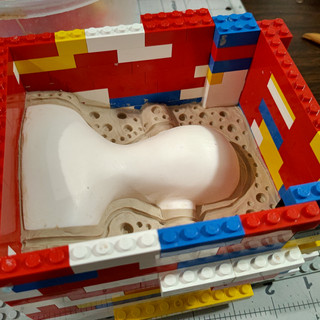
Mold Box and Clay Wall
I love using Legos for the mold box for two-part molds, they're strong, easy to assemble, easy to reconstruct in exactly the same way and reusable. After you build the box use clay to build up a wall where your seam line will be. It should be roughly in half of your model, it's great to hid seams where there are hard edges. Like on the ear or back of the shoulder on my bust. The ear in particular makes for a nice large key for the mold to come back together.
Take your time on the clay wall, the cleaner you get this step, the cleaner your casts can be. Use wooden tools at this step so you don't damage your Master cast. try to get the clay to as close to a 90-degree, sharp edge on the flat parts of the cast for the best results. as you can see, it's really helpful that the Legos are easy to undo and reassemble so you can get your tools at good angles to work the clay.
I use Sculptex soft for the clay:


Making Registration Keys
Registration keys help your mold line up correctly as you put it back together, it also helps keep things from shifting around while casting. I always start with a trench all the way around my Master. This key in particular helps keep the seam line really clean.

Next, I use the handle end of some of my sculpting tools to put holes starting with bigger holes before moving to small ones. I've found it's best to keep your tool perpendicular to the bottom of the mold, not the clay itself.


Then it's time to build up the Lego wall and prep the mold for pouring silicone. Make sure to use some ease release spray! I use Mold Star 15 slow from Smooth-on (


Second Half of the Mold
Once the part one side has cured, you can move onto the part two. It's Legos to the rescue again as it's easy to take apart the Lego wall and remove the clay. be careful at this stage to not remove your Master. I use q-tips+ isopropyl alcohol and my wooden sculpting tools to get off as much clay as possible, especially right around the master.


Build the Legos back up for the mold wall. I actually ran out of legos, so I carefully removed some Legos from the bottom (top, since the Legos are upside down) to finish up. It still worked, there was plenty of Legos to have the 2nd half be sealed and strong.


At this stage it it super critical to spray the release spray before pouring the silicone. the release spray will keep the silicon from curing to the first half, thus keeping your hard work from being ruined. I always do at least two layers of spray letting it dry for 15ish minutes in between. I usually do a couple more for good measure because I'm paranoid.
Sometimes when I pour silicone, I miscalculate and have just barley not enough. in that case I like to have cut up pieces of old silicon on hand to give me the volume I need. all you have to do it poke them down under the surface and you'd never even know they are there. it's also a good way to recycle old worn our molds. I probably wouldn't use this technique if i needed a super high-quality mold and especially not if I intended this mold to be cast under pressure


Demolding
Here is a downside to Legos, there is quite a bit of flashing and cleanup to do when breaking down the mold walls. Your Legos will never be 100% clean again, but I try to get as much flashing off the Legos as I'm breaking them down just have them ready to go next time I want to build a mold.


When you pull out your mold it may be obvious where the mold line is, or it could be hidden, just keep pulling and squishing around until you find a loose edge to get your fingers in. Then it's a matter of slowing peeling it open until you can pull the Master copy out.


And that's how I do my molds! Hope you were able to pick up some tips ^>^


